Install a Configuration Manager 2012 R2 in a lab – 7. Install Configuration Manager Primary Site

This installation lab will come to an end. The last step is now installing the System Center 2012 R2 Configuration Manager Primary Site. All the prerequisites are installed and configured so we can start with the installation. I did it like this:

01_ConfigMgr  Install
02_ConfigMgr Next
03_ConfigMgr Next
04_ConfigMgr Type in Serial Number and click Next
05_ConfigMgr Accept license and click Next
06_ConfigMgr Accept all license terms and click Next *
07_ConfigMgr Type in path where to download the installation updates and click next
08_ConfigMgr wait until it’s downloaded
09_ConfigMgr Next
10_ConfigMgr Next
11_ConfigMgr Type in Site Code (must be unique), a name for the site, the installation folder (best practice is not to use the default path and click Next
12_ConfigMgr Install Stand-Alone Site and Click Next
13_ConfigMgr Yes
14_ConfigMgr Next
15_ConfigMgr Type in where you’re Database Files should be stored and click next
16_ConfigMgr Next
17_ConfigMgr make the selections and click next
18_ConfigMgr Change to HTTP and click Next
19_ConfigMgr Click no and next
20_ConfigMgr Next
21_ConfigMgr Begin Install**
22_ConfigMgr Close

* You have to accept these licenses because SQL Server Express and SQL Server Agent  is for Secondary Sites, Silverlight for the Client Agent.
** The warning which was generated depends on the Memory available in my test environment. I have just 8 GB over all, but SCCM want to have 8 GB just for the SQL. So ignore it.

Now you have a well installed configuration manager environment.

Regards,
Matthias

Install a Configuration Manager 2012 R2 in a lab – 6. Extend AD Schema

Before you can install Configuration Manager you should extend your Active Directory and give your SCCM server rights to create objects under the system container in AD. Attention, an AD schema extension cannot be reverted. Do it like this:

  Start extadsch.exe as admin which is on the installation sources of SCCM
000_AD Check the log C:\extadsch.log
01_AD start DSA.MSC, click view and Advanced Features
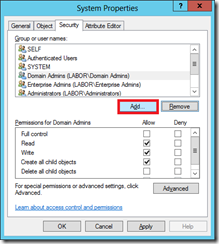
02_AD Right click on system and click properties
03_AD click Add…
04_AD click Object Types
05_AD select Computers and click OK
06_AD type in your sccm server name and click OK
07_AD select full control and click Advanced
08_AD select your sccm server and click Edit
0_AD This object and all descand objects and click OK

Regards,
Matthias

Install a Configuration Manager 2012 R2 in a lab – 5. Install Windows Server Update Services (Powershell)

The Installation of this component is easy. Just use the following:

#Installing services
Install-WindowsFeature UpdateServices-Services, UpdateServices-DB

#run post-installation tasks and set the SQL Server and Instance
‘C:\Program Files\Update Services\Tools\WsusUtil.exe’ postinstall SQL_INSTANCE_NAME=localhost

That’s all,
Matthias

Install a Configuration Manager 2012 R2 in a lab – 5. Install Windows Server Update Services

Like in the posts before described I install in this lab WSUS after installed SQL Server because I want to store the SUSDB in the existent SQL Server. The following table shows you how to install the WSUS for Configuration Manager 2012 R2:

01_WSUS open Server Manager, click on all servers, right click on your server and click Add Roles and Features
02_WSUS click Next
03_WSUS click Next
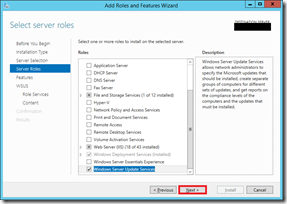
04_WSUS select Windows Server Update Services
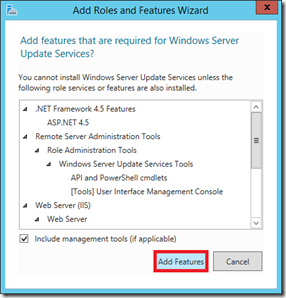
05_WSUS Add Features
06_WSUS Next
07_WSUS Next
08_WSUS Next
09_WSUS select WSUS Services and Database and click Next
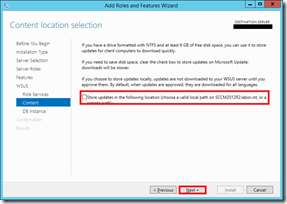
10_WSUS unselect checkbox and click Next
11_WSUS type in your server name and click check connection and click next
12_WSUS click Install
13_WSUS Launch Post-Installation Tasks and click close

The Post-Installation Tasks creates the database on the SQL and configures.

Regards,
Matthias

Install a Configuration Manager 2012 R2 in a lab – 4.5 Configure SQL Server 2012 SP1 for better performance (optional)

To increase the performance you could add for every CPU Core you have one TempDB. In a productive environment you should configure the memory usage for the SQL server as well to 50 % of the complete memory. The following table shows how to:

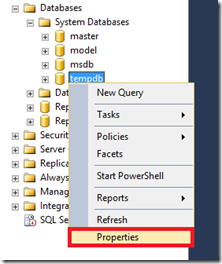
01_ConfigureSQL right click on tempdb and click Properties
02_ConfigureSQL files and Add
03_ConfigureSQL fill in like the pic shows…
04_ConfigureSQL … until you have so many files like cpu cores
05_ConfigureSQL right click on your server and click properties
06_ConfigureSQL Memory, type in your maximum memory usage (the half of your memory) and click OK

Regards,
Matthias

Install a Configuration Manager 2012 R2 in a lab – 4. Install SQL Server 2012 SP1 (Powershell)

I finished my experiment with unattended installation of SQL Server 2012. It was not that complicated I guessed but you cannot say it’s easy. So many setup switches…

What you have to do before starting the script I wrote (it’s at the end of this blog):

  • Copy the content of the SQL installation sources to disk
  • create an folder in this sources which is called “SQLUpdates” (you can name it different)
  • Copy the Service Pack 1 and the Hotfix KB2793634 into the folder created

Following the script/command line I wrote, start from the root of the source files folder:

.\setup.exe /ACTION=Install /IACCEPTSQLSERVERLICENSETERMS
/UpdateEnabled=1 /UpdateSource=.\SQLUpdates
/features=”SQLEngine” “RS” “SSMS”
/installshareddir=”D:\SQL\(X64)” 
/InstallsharedwowDir=”D:\SQL(X86)”
/instancedir=”D:\SQL(X64)”
/Instancename=MSSQLSERVER
/q
/AGTSVCACCOUNT=”NT Authority\System”
/INSTALLSQLDATADIR=”D:\SQL\(X64)”
/SQLBACKUPDIR=”E:\MSSQLSERVER\BACKUP”
/SQLCOLLATION=SQL_Latin1_General_CP1_CI_AS
/SQLSYSADMINACCOUNTS=”labor\domain admins” “labor\administrator”
/SQLSVCACCOUNT=”NT Authority\System”
/SQLTEMPDBDIR=”E:\MSSQLSERVER\TEMPDB”
/SQLTEMPDBLOGDIR=”E:\MSSQLSERVER\LOGS”
/SQLUSERDBDIR=”E:\MSSQLSERVER\USERDB”
/SQLUSERDBLOGDIR=”E:\MSSQLSERVER\Logs”
/RSSVCACCOUNT=”NT AUTHORITY\SYSTEM”
/INDICATEPROGRESS
/PID=”xxxxx-xxxxx-xxxxx-xxxxx-xxxxx”

Now I explain the different switches I used:

/ACTION=Install –> install SQL
/IACCEPTSQLSERVERLICENSETERMS –> to accept the license terms
/UpdateEnabled=1 –> Updates should be install as well
/UpdateSource –> should be the directory where the updates stored
/features –> features which should be installed (SQLEngine=Database Engine; RS= Reporting Services; SSMS=Management Studio and so on
/installshareddir –> path you want to install the SQL 64 bit features
/installsharedwowdir –> path you want to install the SQL 32 bit features
/InstanceDir –> path where the instance should be stored (not DB files)
/Instancename –> Name of the instance
/q –> no GUI and no user interaction
/AGTSVCACCOUNT –> Account which runs the SQL Agent
/InstallSQLDataDir –> path you want to store the default databases
/SQLBackupDir –> default directory for SQL Backups
/SQLCollation –> Collation settings of the instance (for ConfigMgr 2012 R2 SQL_Latin1_General_CP1_CI_AS)
/SQLSYSADMINACCOUNTS –> Accounts which should be sysadmin of the instance
/SQLSVCACCOUNT –> Account runs the SQL Service
/SQLTEMPDBDIR –> directory stores the database files of TempDB (Should be seperated)
/SQLTEMPDBLOGDIR –> directory stores the database log files of TempDB
/SQLUSERDBDIR –> directory stores the database files of UserDB
/SQLUSERDBLOGDIR –> directory stores the database log files of UserDB
/RSSVCACCOUNT –> Account runs the reporting services service
/INDICATEPROGRESS –> extended logging of the installation as console output
/Pid –> Product Code

More details you’ll get here.

Regards,
Matthias

Install a Configuration Manager 2012 R2 in a lab – 4. Install SQL Server 2012 SP1

This chapter will show you what you have to do to install the MS SQL Server 2012 and Service Pack 1 for System Center 2012 Configuration Manager R2. The Service Pack 1 for SQL Server 2012 is available for download here. The collation settings have to be SQL_Latin1_General_CP1_CI_AS. The partition which stores the databases and log files should be formatted with an allocation unit size of 64 kb regarding performance described here. You have to install after Service Pack 1 the hotfix KB2793634 like described here.

The following table shows how to install the SQL Server:

01_SQL right click on setup.exe and click run as administrator

02_SQL

click on installation and click on new sql server

03_SQL

click ok
04_SQL click next
05_SQL accept the license terms and click next
06_SQL click next
07_SQL click next (the warning is just regarding .Net cannot access the internet)
08_SQL click next
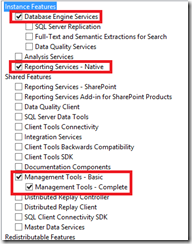
09_SQL select Database Engine Services, Reporting Services – Native, Management Tools – Basic
10_SQL type in install path and click next
11_SQL click next
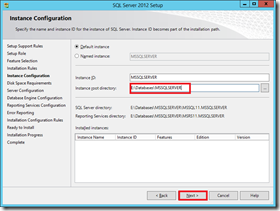
12_SQL type in Instance Root directory (seperate partition) and click next
13_SQL click next
14_SQL change the accounts to nt authority\system
15_SQL on the collation tab click customize
16_SQL select SQL collation… and select SQL_Latin1_General_CP1_CI_AS and click OK
17_SQL click next
18_SQL click add current user and click add
19_SQL type in Domain Admins and click OK
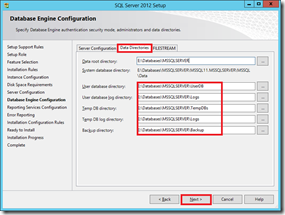
20_SQL on the Data Directories Tab change the Directories if you want
21_SQL click next
22_SQL Next
23_SQL Next
24_SQL Install

25_SQL

Close

Now let’s take a look on the installation of Service Pack 1:

  run the setup as administrator

26_SQL

Next
27_SQL Accept license terms and click next
28_SQL click next
29_SQL click next
30_SQL Update
31_SQL Close

Now the hotfix because MSIEXEC is running after installation

  run the hotfix as administrator
32_SQL click Next
33_SQL accept license terms and click next
34_SQL Next
35_SQL Next
36_SQL Update
37_SQL Close

That’s just the installation. I’m very excited because I guess the installation over PowerShell/Command Line will be more complex than the chapters before.

I look forward,
Matthias

Install a Configuration Manager 2012 R2 in a lab – 3. Install Windows ADK 8.1 Components (Powershell)

The next part is to install the following components of the Windows Assessment and Deployment Kit:

  • Deployment Tools
  • User State Migration Tool (USMT)
  • Windows PreInstallation Environment (WinPE)

The WADK 8.1 is available for download here. I had downloaded all binaries before I started to install. Following the unattended command line for the installation of these components:

Adksetup.exe /features optionid.deploymenttools optionid.windowspreinstallationenvironment optionId.UserStateMigrationTool /quiet /installpath D:\ADK /ceip off /norestart /log $env:logdir\adk.log

Explanation of the switches:
/features –> defines which components of the WADK will be installed
/quiet –> no user interaction and no GUI
/installpath –> Installation path
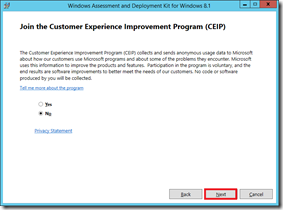
/ceip –> turn on or off customer experience improvement program
 
/norestart –> no restart after installation
/log –> Log file path (I added an environment variable “logdir” but you can use a normal path)

Regards,
Matthias

Install a Configuration Manager 2012 R2 in a lab – 3. Install Windows ADK 8.1 Components

The next part is to install the following components of the Windows Assessment and Deployment Kit:

  • Deployment Tools
  • User State Migration Tool (USMT)
  • Windows PreInstallation Environment (WinPE)

The WADK 8.1 is available for download here. I had downloaded all binaries before I started to install. The following table shows the steps you have to do for installing the components:

01_ADK run adksetup.exe as administrator
02_ADK Type in the path (here D:\ADK) and click Next
03_ADK Next
04_ADK Accept
05_ADK Select the three components (see list above) and click install
06_ADK Close

Regards,
Matthias

Install a Configuration Manager 2012 R2 in a lab – 2. Install required Windows Server Roles and Features (Powershell)

The same steps like in the post before now I did with Windows PowerShell. I recommend to do this with Windows Powershell because it takes less time than with the GUI. The Script looks like follows:

Install-WindowsFeature web-server, web-ISAPI-Ext, Web-Windows-auth, Web-ASP, Web-Asp-Net45, Web-Metabase, Web-WMI, Web-Http-Redirect, Web-Scripting-Tools, wds, rdc, bits, net-framework-features

Regards,
Matthias